Tuesday, October 23, 2012

Response new function named as Response.RedirectPermanent


OVERVIEW 

Recently, I came to know about the new function of Response named as Response.RedirectPermanent. So what is Response.RedirectPermanent? Where to use it?
Its same like Response.Redirect() function as it redirects you from one page to another but it returns HTTP status code 301 as compared to HTTP 302 returned by response.redirect().
So, in this article we would have brief overview of Response.RedirectPermanent. 


Response.RedirectPermanent

Consider a following scenario:
We have a web application which sells products to end users. In order to increase the user count or to bring more users to the website, company decides to start with discounts on certain products. Hence, it introduces the new page named as Discount.aspx listing all the products which has discounts on them. When user clicks on any of the discounted products, website redirects the user to page named as Products.aspx where user can view the details of product.
In order to increase the revenue company hires the SEO and registers the page on different search engines like Google, Yahoo etc. Hence, discount page gets registered on different search engines.

Now, after some months company decides that it don't want to give discounts on the products and thinks of removing the page. But they don't want to lose their customers who were coming to their site through discounted page.

In this case, we have two options
1) Copying the content of products page to discounted page
Disadvantage: When search engines see the same data on both discounted and products page, they can penalize the site for having the duplicate content and would delist the site.

2) Use Response.Redirect
We can use Response.Redirect on the page load of discounted page which would redirect the user to products page.
Disadvantage: When we use response.redirect, then it returns the status code as HTTP 302 temporarily redirected to different search engines.So, search engine store this information in their table that this discounted page had returned status code HTTP 302 and it was temporary re-directed.
Search engines expect that next time when we would hit discounted page, it would show the data and shouldn't return 302 status code. If next time again, page returns status code 302 then search engine penalizes the site and would delist the site.

Hence, in this scenario we should always use Response.RedirectPermanent.
What does Response.RedirectPermanent?
When we use Response.RedirectPermanent then it returns status code HTTP 301 Moved Permanently.It tells different search engines this page has permanently moved to new page. By this different search engines updates their index with new page. So, next time if someone clicks on discounted page, user would be automatically directed to products page by search engines.

So, let's build a small application, which would have  two buttons - one button would use Response.Redirect and other button would use Response.RedirectPermanent. 

We can view the GET request details by using the tool named as HTTPDebugger.Below are the GET request. You can see that when we have use Response.Redirect then browser has returned status code as 302 Found; however in case of Response.RedirectPermanent status code returned is 301 Moved Permanently. 
Below is the screenshot


Conclusion

Whenever we want to remove any page from website, we should always use Response.RedirectPermanent. With this we wouldn't loose our customers directed to our site through different search engines.

Hope with this article, we would have brief overview of Response.RedirectPermanent.

Friday, October 19, 2012

File Upload in Update Panel

BACKGROUND

AJAX update panel is used to prevent the page to have the full postback.Using update panel we can have partial page postback. Partial page postback does the following 
1) Improves the performance of the application 
2) Decrease the page load time of the application 
3) Decreases the round trip between the application and server 
4) Only the section in web page which needs to be refreshed gets postback 

We know that we can upload file to server using File upload control. However, if we use file upload control inside update panel, then it doesn't works. The reason for this is that file upload control doesn't work with asynchronous postback.
In this article, we would be working on making file upload control work with update panel and update progress. 

Let's do some coding !!


CODE

We would be creating small web application, where we would be have following

  • File upload control to upload the files
  • Upload button to SAVE image and view the uploaded image
  • Process button to show Upload progress control
So let's start

To make AJAX work in your application, we have to first place SCRIPT MANAGER on our page. Now, if you are using master page in your application and your web page inherits master page, then you can place script manager in master page. If you don't want master page to have script manager,you can also place script manager on specific web pages.
Here, i am placing script manager on my web form as i am not inheriting any master page


 <asp:ScriptManager ID="ScriptManager1" runat="server"></asp:ScriptManager>

Next we would place update panel on our web page. Inside update panel, we would place file Upload control, Upload button, Process button, Upload progress control and image control.
Below is the code

  <asp:UpdatePanel ID="UpdatePanel1" runat="server" UpdateMode="Conditional">
            <ContentTemplate>
                <asp:FileUpload ID="fileUploadImage" runat="server"></asp:FileUpload>
                <asp:Button ID="btnUpload" runat="server" Text="Upload Image" OnClick="btnUpload_Click" />
                <br />
                <asp:Button ID="btnProcessData" runat="server" Text="Process Data" OnClick="btnProcessData_Click" /><br />
                <asp:Label ID="lblMessage" runat="server" Text="Image uploaded successfully." Visible="false"></asp:Label><br />
                <asp:UpdateProgress ID="UpdateProgress1" runat="server" AssociatedUpdatePanelID="UpdatePanel1">
                    <ProgressTemplate>
                        Please wait image is getting uploaded....
                    </ProgressTemplate>
                </asp:UpdateProgress>
                <br />
                <b>Please view the below image uploaded</b><br />
                <asp:Image ID="img" runat="server" Width="100" Height="100" ImageAlign="Middle" />
            </ContentTemplate>
        </asp:UpdatePanel> 

As told previously, file upload control doesn't works with asynchronous postback, Hence, we would need to postback to get the file uploaded. Here comes the role of TRIGGERS.

Update Panel control has property named as trigger which has 2 properties - PostbackTrigger and AsynchronousTrigger. In these properties we can specify, for which control we want the postback even if it is specified inside update panel.

Below is the update code:


  <asp:UpdatePanel ID="UpdatePanel1" runat="server" UpdateMode="Conditional">
            <ContentTemplate>
                <asp:FileUpload ID="fileUploadImage" runat="server"></asp:FileUpload>
                <asp:Button ID="btnUpload" runat="server" Text="Upload Image" OnClick="btnUpload_Click" />
                <br />
                <asp:Button ID="btnProcessData" runat="server" Text="Process Data" OnClick="btnProcessData_Click" /><br />
                <asp:Label ID="lblMessage" runat="server" Text="Image uploaded successfully." Visible="false"></asp:Label><br />
                <asp:UpdateProgress ID="UpdateProgress1" runat="server" AssociatedUpdatePanelID="UpdatePanel1">
                    <ProgressTemplate>
                        Please wait image is getting uploaded....
                    </ProgressTemplate>
                </asp:UpdateProgress>
                <br />
                <b>Please view the below image uploaded</b><br />
                <asp:Image ID="img" runat="server" Width="100" Height="100" ImageAlign="Middle" />
            </ContentTemplate>
            <Triggers>
                <asp:PostBackTrigger ControlID="btnUpload"  />
                <asp:AsyncPostBackTrigger ControlID="btnProcessData" />
            </Triggers>

 </asp:UpdatePanel>


Below is the code behind code for both Upload button and ProcessData button:

Upload Button code:

 protected void btnUpload_Click(object sender, EventArgs e)
        {
            if (fileUploadImage.HasFile)
            {
                
                 fileName = fileUploadImage.FileName;
                fileUploadImage.SaveAs("~/Images/" + fileName);
                img.ImageUrl = "~/Images/" + fileName;
            }
        }

ProcessData Button code:


  protected void btnProcessData_Click(object sender, EventArgs e)
        {
            System.Threading.Thread.Sleep(5000);
            lblMessage.Visible = true;
            
        }

I hope with this article will help you to work with fileupload control in update panel.


Wednesday, October 10, 2012

Dark Color Theme in Visual Studio 2012

Visual Studio 2012 comes with default theme with gray color and all the menus in CAPS. I had posted an article to have different color themes in Visual Studio 2012.

Today, I read that Visual Studio 2012 has one more color theme named as DARK. When you install Visual Studio 2012, you will have only 2 themes - Light or Dark.

To change the current LIGHT theme to DARK theme, select Options from Tools menu


After this you will view following screen, where you can see option to select 'Color Theme'


Change the Color theme from Light to Dark.


After this you would altogether feel different Visual Studio experience.

Hope this article of mine would make you familiar with one more feature of Visual Studio 2012.Stay tuned to my blog to read more articles.

Tuesday, October 9, 2012

Default Browser Switcher in Visual Studio 2012

Background

While developing web applications, we have to test our application in different browsers.

  • Check whether the application design is proper in all the browsers
  • Check if images are shown properly
Testing application on different browser, would decrease our productivity and also would waste our time.


Default Browser Switcher

With Visual Studio 2012 , we have inbuilt browser switcher extension available now.VS 2012 has provided us the option to select the browser in which we want to view our application. Please see the below image where the browser selection section is highlighted


By default when you install VS 2012, Internet explorer is the default browser; however you can select any of the browser (installed on your machine) from drop down as shown below


The check sign signifies the default browser on which you would view the application. You can change the browser by selecting from drop down.
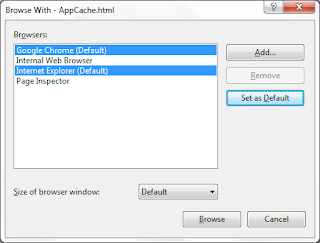
If any browser (installed on your machine) is not visible in drop down list, you can select 'Browse With' from the drop down which would open  the following screen


From this screen you can select any of the browser and set it as default browser by clicking the 'Set as Default' button.

You can also select multiple browser as default. Press Ctrl and select two browser at once and click 'Set as Default'. By doing so, you have set multiple browser at once like below


Having multiple browser as default browser would help you to view your application in different browser at same time. After selecting multiple browser as default, click Browse button and you would see that your application runs on multiple browsers you have selected at same time.
This helps us in testing our application at same time

Hope with this article of mine you would have come of know about the new feature in Visual Studio 2012. Stay tuned to my blog to read more articles.

Sunday, October 7, 2012

How can you increase your PRODUCTIVITY

I just read a very good article by Scott Hanselman on how you can increase your productivity.I would list down the broad points of the article

1) We spend whole day reading and replying to the emails and at the end of your day, you feel you haven't worked much. So, fix one hour for the emails and then start working.
2) Read one book at a time and don't pile up books at your study table. Keep only that book which you like reading and finish it up.
3) Make time for yourself everyday. You schedule the meeting everyday and you reach there on time; similarly schedule time for yourself and make time for you.
4) Prioritize your work and say 'NO' often to others
5) List all things that weigh you down and let them go. Don't care much about things.
6) Its hard to focus on all the things happening around you. So, focus on thing for 25 minutes and then give 5 minutes break.
7) Set everyday goals, weekly goal and monthly goals. This in turn would increase productivity. 


Below is the link to the article
How can you increase your PRODUCTIVITY